

A few months ago I saw an interesting cake in the bakery chest at Kroger. It was frosted and looked like a bear-shaped cake and then I realized they were just cupcakes placed right next to eachother and frosted over. I thought that was an excellent idea, as cupcakes are pre-portioned and easy to eat with your hands... but apparently you can still decorate them like you would a normal sheet cake so it might even be easier than decorating each one separately. I filed it away in my mind and then finally got to try it out on my own for my group's holiday party.
These pictures will disclose I work at GM so there's no hiding that. Our party was scheduled at WhirlyBall and we were allowed to bring in desserts so I signed myself right up (and my mom made Christmas cookies) and started researching. I knew I'd already be super busy (see buche and cookie exchange posts... too lazy to link) but I couldn't resist.

I went to CakeCentral.com to see examples of cupcake-cakes and there were several! For anyone interested in cake decorating, I recommend getting a free user account there - just the quantity of pictures is worth it for getting ideas. I realized that the "star method" of decorating cakes is what I wanted to do ... I wanted to use a star-tip frosting tip and create a design on the top of the cake using hundreds of little stars (in different colors)... it's almost like impressionism or pointillism paintings for you art buffs!

During Thanksgiving break, I had a chance to try out my star-making skills with my mom advising. It really only took a minute to see how it works and give it a whirl. In about 15 minutes, I had a mock GM logo on some wax paper and I was content in my ability to do this for the real thing a few weeks later.

Since my yule log took all weekend, I baked the cupcakes Monday night and Tuesday nights. I made 1 box of chocolate and 1 box of yellow, so people could pick and choose their favorite flavor. By Tuesday night, I had mixed up a large triple batch of the buttercream icing for decorating. Two boxes (24 cupcakes) was the right amount to cover my group so I got out my 1/2 sheet cake board (cake supply store) with liner and started laying out the cupcakes.
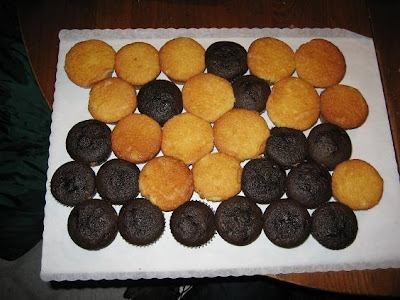 First step was to create a rectangle to fit all the cupcakes on the board, however I staggered them to fill in as many spaces with cupcakes to make frosting easier. I afixed the cupcakes to the cake board by squirting a small dot of frosting on the bottom and placing it on the board. Each cupcake would have a little frosting for that extra umph for keeping it in place during the drive to work and then to whirlyball.

The last task for Tuesday night was to put the first layer of buttercream spread onto the cupcakes, which was pretty easy. I just glopped a bunch on and spread it around to make as even of level cake top that I could. I used the spatula to outline where my white box and underlined GM would go.

I also used a pastry bag filled with white buttercream with a star tip and got all the white stars done for the letters and box outline of the logo, since I had time. All of this went into the fridge to chill overnight.

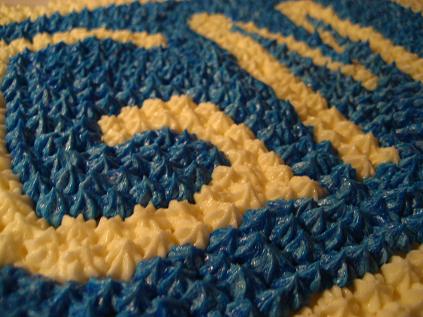
Wednesday night (the night before Whirlyball) I reserved enough white frosting for the remainder of the cake decorating (plus a little extra) and used the rest to make my bright blue I was looking for. I got some great blue food colorings from the cake shop, though I did notice it started to separate from the frosting (if you looked really closely) as my hands warmed it up while decorating. This was a lot of stars to make and your hands can get sore, but I spread it over 2 days and also had to take breaks to re-chill the frosting if it got too soft.
 (the flash makes it look a little less straight than it was because of white frosting underneath in this shot)

 I used the same decorator's icing that I used for the yule log from the Wilton website. This time around, I used a bit of almond extract with the vanilla to create a slightly different (my mom's preference... and tasty) flavor. My favorite cake combination is chocolate cake with white frosting, YUM!

I don't think you need a recipe for box-cake cupcakes. hehe
Buttercream Icing (great for decorating)
From Wilton.com
Ingredients:
1/2 cup shortening
1/2 cup butter (softened)
1 teaspoon vanilla extract (I used 2 tsp almond and 1 tsp vanilla for my 3 batches)
4 cups sifted powdered sugar (approx 1 lb but could be more or less depending on consistency you want)
2 tablespoons milk (more or less if needed)
Directions:
In large bowl, cream shortening and butter with electric mixer. Add vanilla. Gradually add sugar, one cup at a time, beating well on medium speed. Scrape sides and bottom of bowl often. When all sugar has been mixed in, icing will appear dry. Add milk and beat at medium speed until light and fluffy. Keep bowl covered with a damp cloth until ready to use. For best results, keep icing bowl in refrigerator when not in use. Refrigerated in an airtight container, this icing can be stored 2 weeks. Rewhip before using.
YIELD: Makes about 3 cups.

I went to CakeCentral.com to see examples of cupcake-cakes and there were several! For anyone interested in cake decorating, I recommend getting a free user account there - just the quantity of pictures is worth it for getting ideas. I realized that the "star method" of decorating cakes is what I wanted to do ... I wanted to use a star-tip frosting tip and create a design on the top of the cake using hundreds of little stars (in different colors)... it's almost like impressionism or pointillism paintings for you art buffs!

During Thanksgiving break, I had a chance to try out my star-making skills with my mom advising. It really only took a minute to see how it works and give it a whirl. In about 15 minutes, I had a mock GM logo on some wax paper and I was content in my ability to do this for the real thing a few weeks later.

Since my yule log took all weekend, I baked the cupcakes Monday night and Tuesday nights. I made 1 box of chocolate and 1 box of yellow, so people could pick and choose their favorite flavor. By Tuesday night, I had mixed up a large triple batch of the buttercream icing for decorating. Two boxes (24 cupcakes) was the right amount to cover my group so I got out my 1/2 sheet cake board (cake supply store) with liner and started laying out the cupcakes.
 First step was to create a rectangle to fit all the cupcakes on the board, however I staggered them to fill in as many spaces with cupcakes to make frosting easier. I afixed the cupcakes to the cake board by squirting a small dot of frosting on the bottom and placing it on the board. Each cupcake would have a little frosting for that extra umph for keeping it in place during the drive to work and then to whirlyball.
The last task for Tuesday night was to put the first layer of buttercream spread onto the cupcakes, which was pretty easy. I just glopped a bunch on and spread it around to make as even of level cake top that I could. I used the spatula to outline where my white box and underlined GM would go.

I also used a pastry bag filled with white buttercream with a star tip and got all the white stars done for the letters and box outline of the logo, since I had time. All of this went into the fridge to chill overnight.

Wednesday night (the night before Whirlyball) I reserved enough white frosting for the remainder of the cake decorating (plus a little extra) and used the rest to make my bright blue I was looking for. I got some great blue food colorings from the cake shop, though I did notice it started to separate from the frosting (if you looked really closely) as my hands warmed it up while decorating. This was a lot of stars to make and your hands can get sore, but I spread it over 2 days and also had to take breaks to re-chill the frosting if it got too soft.
 (the flash makes it look a little less straight than it was because of white frosting underneath in this shot)
 I used the same decorator's icing that I used for the yule log from the Wilton website. This time around, I used a bit of almond extract with the vanilla to create a slightly different (my mom's preference... and tasty) flavor. My favorite cake combination is chocolate cake with white frosting, YUM!
I don't think you need a recipe for box-cake cupcakes. hehe
Buttercream Icing (great for decorating)
From Wilton.com
Ingredients:
1/2 cup shortening
1/2 cup butter (softened)
1 teaspoon vanilla extract (I used 2 tsp almond and 1 tsp vanilla for my 3 batches)
4 cups sifted powdered sugar (approx 1 lb but could be more or less depending on consistency you want)
2 tablespoons milk (more or less if needed)
Directions:
In large bowl, cream shortening and butter with electric mixer. Add vanilla. Gradually add sugar, one cup at a time, beating well on medium speed. Scrape sides and bottom of bowl often. When all sugar has been mixed in, icing will appear dry. Add milk and beat at medium speed until light and fluffy. Keep bowl covered with a damp cloth until ready to use. For best results, keep icing bowl in refrigerator when not in use. Refrigerated in an airtight container, this icing can be stored 2 weeks. Rewhip before using.
YIELD: Makes about 3 cups.
Thank you so much for the cupcake cake instructions! You made it so easy to follow that my hubby and I made a Spongebob cake for our son's first birthday over the summer. We're already planning the next one! (The frosting recipe is addictive.)
ReplyDeletethis looks great, and super easy! thanks! i'm glad i came a cross this blog =) it's VERY helpful
ReplyDeleteSo glad that this was helpful, it's a fun project!! Thanks for dropping by. :)
ReplyDelete