

I went to CakeCentral.com and looked through a bunch of different cakes.. from 3-D crosses to 3-D bibles to little babies or stained glass.. this and that. I came across one that my advisor (Mom) and I liked the best, which is what I used for the idea of this one. The cake I found was white with pink fondant bow and I knew I'd rather find a cute real ribbon and coordinate my cake to that. ... and use some boy colors!
I originally thought blues and greens but when I went to Michaels, I found a Martha Stewart ribbon and nothing else that had cute little brown and blue stripes... so green got cancelled out, which was fine. White was my third accent color. Blue and brown is one of my favorite combos... see also pink and brown. I have seen young Jackson sporting blue and brown on many occasions so I know his mom will at least like this color scheme as well!
This was my first time making a square cake... I think it was about time. I wanted it to have perfect corners and my goal was to make this buttercream look smooth like fondant. Well you'll see that didn't really happen but it was a learning experience. I decided to go with my new buttercream - Mousseline - which was .. different .. to deal with in the realm of decorating.
First things first, I thought - why not chocolate cake? We sorta have a chocolate theme anyway! I bought a wilton 10in square pan and used my newly acquired Cake Box Mix ratio to pan chart that I just got in my first decorators class on Wednesday. The chart said 1.5 boxes per 10in square.. this is more than I would've used so no wonder my cakes don't exceed the rim of the pan and I end up with shorter layers!
I learned in class it was also easier to level a cake right from inside the pan - but this only works if the cake dome is above the level of the walls, which mine usually aren't. I will say that it was sorta a pain to measure cups of batter in my 1st box of cake mix (I made each box separately like a good girl), so that I knew how many cups to add from the 2nd box (half). I ended up with around 5.5 cups per box. I only had one 10in pan (cheapskate) so I had to bake one layer at a time... which was fine, The Husband was gone and I had nothing better to do.
I noticed the first pan was much fuller than my normal cakes and I thought "whew I just made it from that spilling over into my oven!" .. you'd think I would've thought of putting a pan underneath for the 2nd layer but I didn't... sure enough that one was slightly fuller and I did have some overflow spillage. Luckily it popped right off from the bottom of my oven!
After the two layers were baked, I wrapped them up to continue the cake on Saturday. I kept the 2nd one in the pan and the 1st one was already mounted on the cake board which was already wrapped in foil, so that was good to go. I put down little squares of wax paper under each side of the bottom layer for when it came time to frost and I could easily pull them away afterwards. The trick here is to barely put any wax paper under the cake, otherwise you might be dragging the cake when you try to remove them! Trust me, this happened to me last time...
On Saturday I made my first batch of Mousseline. I used the pasteurized Break-Free eggwhites that you can find at the store to avoid any worry of whether or not these things get cooked with the sugar syrup mixture. It ended up working just as well and I flavored the mousseline with vanilla and amaretto (I ran out of almond).

I took a small amount of icing and mixed in some crushed oreo bits (used my mini chopper!) and this was the filling. I piped a white border around the edge of the cake to keep the cookie filling from squeezing out and messing with my outer frosting.
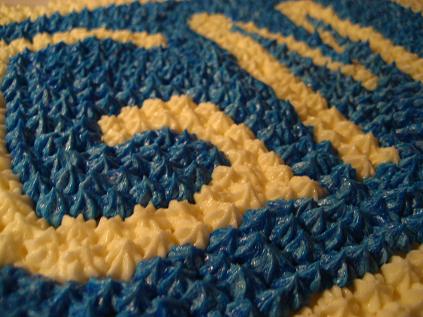
Finally it was time to have some fun with color, and I needed to match the rest of the icing to the blue line in the ribbon. I used a mixture of paste and gel food coloring - blues, a little yellow and a little green. When I was pretty happy with it, I put down a crumb coat.
Here is where I really felt the pain of using Mousseline and not having my predictable decorators icing. As a re-cap, I chose Mousseline because it has a totally different flavor - it's buttery and light and airy. Nothing like the super sweet decorators icing, which uses some crisco with the butter. With mousseline, it's a meringue style buttercream so it's all natural and in a totally different class from the other styles of frosting. We should have a frosting taste off to see which buttercream is the best! I think that is Giada chopping some food in the background!
BUT... while mousseline has an outstanding light and pure flavor, it doesn't crust over. If you're not a cake person, this means it doesn't get a dried-out little crusty layer after sitting at room temp for 15-30 minutes. Crusting over is super useful -- if you happen to nudge it or want to smooth things out - no problem, it helps. You can scrape off mistakes and when you make a crumb coat, you can frost on top of it, being sure not to pull up any more crumbs if the crumb coat is crusted. Welllllllll.... with mousseline... this never happens. Think of the consistency of whipped cream... it's always tacky and when you touch it, it makes a peak as you pull away. This, my friends, is very hard to make look smooth.
Also, because mousseline has all this air whipped into it, it gets little bubbles as it sits and you work with it. They pop and make a bumpy appearance. Unless you refrigerate it, it will not stiffen up so a crumbcoat can just be scraped away like nothing. Still, I think mousseline is a good choice if the flavor is what you want AND you know how to work with it. Next time, I'd refrigerate it after crumb coating, and then apply the 2nd layer. Like with other buttercreams, the hot-water method works for using your spatula and making the sides smooth. Dip your spatula in hot water, wipe, and slowly smooth out airbubbles and imperfections. This also works with chilled mousseline, or room temperature.
So, let's just say I fussed around with making the sides look smooth before I ... figured it out/gave up. Looking at my camera pictures, it actually was pretty smooth (until I botched it later) so I am happy to know it's possible. I really liked my latest addition to my smoothing tools - a brand new straight edge scraper from the hardware store. This worked well and was longer than the height of the cake. The corners were difficult to get to look "perfect"... but they weren't too bad.
I had read about using real ribbon on cake... there are two things to worry about. First, the butter or shortening may soak into the ribbon and give it grease stains... fine if it's the whole ribbon but if it only happens to be blotchy? This will look bad! I read that to stay away from this, you can iron on wax paper to the back of the ribbon.. or you can douse it in crisco or vegetable oil to "beat it to the punch." Another thing to worry about is seeping of the ribbon dyes into the frosting. I tried a sample of my ribbon on the frosting and it didn't seem like it'd bleed, and that was true - it turned out just fine on the cake. (This was Martha Stewart grosgrain craft ribbon from Michaels, fyi)
I had already decided to skip the idea of cutting a strip of parchment paper the exact width / length of the ribbon to protect the cake and the ribbon.. there's no way that the parchment would be perfect, it'd be hard to bend the ribbon and I knew I'd somehow get the blotchy butter marks on the ribbon anyway. Once doused in veggie oil, the ribbon can have anything taped to it, so the parchment idea was a bust! So, I just stuck with the veggie oil idea (wipe clean of excess oil!!) and while it darkened the colors slightly, it worked great.
I chilled the cake and worked on the bow, which I used separate pieces of ribbon. I used pins to keep the bow together and also to attach the ribbon to the cake (the bow hid the big pearl pin heads). The ribbon went on pretty easy, so then it was on to decorating!
I first tried to take some of the leftover blue icing and change it to brown for the frilly cross, but that was a disaster.. it would've been a chemical cocktail to get it that dark. I opted for ganache, and melted some chocolate chips and heavy cream and then let that cool to a good piping consistency. I forgot to save some white for the initials and dots so I had a can of store-bought icing (haha I seem to use this on every cake!) and here is where my penmanship really gave me some problems...
I ended up messing up the intials so that I scraped them off twice! The cake was no longer its perfect smooth consistency but oh well.. I went over it the best I could with a spatula and finally got some initials on there that I didn't mind. Then with the chocolate - by the time I was ready it was too hard... back in the microwave. Then it was too soft! Well, I was too impatient and ended up using it very drippy wet.
I should've thought out this cross thing a little more. When I doodled it at work a few days ago, I thought "easy, piece of cake"... but things are harder when you have your big hand in the way and you aren't following any sort of plan. I tried moving fast because of the chocolate and.. well, it showed. I was just trying to make things symmetrical and I failed. I ended up really hating with what I had and decided to let the cake chill and attempt to scrape the chocolate off and try again.. or at least parts of it.
I was really impatient and that stupid chocolate wouldn't harden, now that I needed it to! I had dinner.. watched the rest of the Michigan game (which actually had a good ending!), and finally dug into the cake again. The chocolate wasn't brittle and easy to pick off like I had planned but I went forward anyway... I ended up scraping away pieces here and there and leaving the rest due to the chocolate still being soft. I tried to fill in some of the frosting areas which were not smooth anymore, but it was hard with the chocolate design partially still there!
So, basically.. I just did the best I could and even used a pin for some of the fine, fine details. I improved the parts that I truly hated and now they are just "imperfections, but OK" which I could handle. I finished off the cake with a few more curls here and there, and also some white polkadots. Tada, it was done! I had planned on using some shimmery dust on the cross but I don't think that will look good with the dark chocolate color... the brown matches the ribbon so I decided to not mess with it,... it was acceptable.. call it done! Well, after chilling overnight, I noticed that the blue frosting was seeping into the white stripes of the ribbon - but only in certain places! After a 5 second panic, I thought I'd just put on a second layer of ribbon so that the inside one wouldn't show. Luckily I had enough... so this is a good lesson if you're using a light colored ribbon on top of a darker colored frosting. I oiled the second piece of ribbon as well and tried to get it on the cake as tight as possible... If you are using a white frosting, I'd stick with just one layer of ribbon and call it good!
 I brought it over for the baptism on Sunday. Upon removing the ribbon there were no problems and the frosting was very soft at room temperature which gives it that light and airy feeling. It's a buttery frosting but people seemed to like it, so it was a success!
Some of us were able to get pieces of cake to get home, so I do have a note on that. When cold, this mousseline is not my favorite - it is sorta buttery and gets very solid. I popped the extra cake in the microwave for a few seconds and besides making the cake moist and warm, I think the flavor of the frosting improves so I highly recommend serving this frosting at room temperature at the coldest. The oreos in the center for a filling were super tasty, I would add a thicker filling next time, or maybe split the two layers into four! Yum! Thanks for looking!
Recipe Information
Chocolate cake: Duncan Hines butter recipe chocolate. Each 10in square pan takes 1.5 boxes
Frosting: Mousseline Buttercream from Rose / The Cake Bible flavored with vanilla and Amaretto, with a Cookies and Cream (oreos) filling
Wow. I thought this was made by a professional. Great job! I don't think I can do this by myself....
ReplyDeleteI absolutely love this baptism cake! I am looking for ideas for my nephew's cake for tomorrow and I think I just found my inspiration! Thanks for posting this I love your blog definitley going into my favorites!
ReplyDelete